 If you haven’t read about Stage 1 on how to add Khmer Language support to Android OS yet click here (it contains links to download all required tools to translate apk)
Nokorsoft.com
Fig 2. battery settings
2.a Translate an APK app

Fig 2.a MIUI File Manager (partly translated)
Concept:
- get the apk
- decode it
- modify the resources (xml, photos)
- encode it back (repackage it)
- sign it (without signing it you won’t be able to run it properly)
- install it on your phone to test it, when you are happy with the translation share it to the world.
AndroidSuite v115.exe (ICS support)
Notepad++ version 6
2.a.1 install Android Suite & Notepad++
-extract Android Suite to C:\androidsuite\ (or anywhere you can remember)-run the notepad++ installer (in here, npp.6.0.Installer.exe), and follow the instruction on its screen to install.
2.a.2 What to translate and how to translate apk resource files
What to translate:Pretty much, all we need to translate are xml files such as strings.xml, arrays.xml and plurals.xml in values or values-en folders. And images in drwable-hdpi folder
Understand apk resource folder structure

An encoded folder would contain res folder and smali folder.
Most of the time you only need to work on files in following list of res folder.
—————–
drawable: contains xml files that define how an element of the screen (buttons, dropdown lists…) displays.
drawable-hdpi (drawable-en-hdpi): contains images used in the apk (icons, background, animated images…)
layout (layout-land, layout-port): contains xml files to define how each screen of apk display (information dailog, main windows…..) in landscape and portrait screen.
raw folder: contains html files and its required files. (something like displaying error page)
values: default values(strings.xml, plurals.xml, arrays.xml) . most of the time, you will work on values-en folder.
note: values-en, values-zh-rCN, value-en-rAU folders: language resource. If your phone is set to other language rather than English United State, ex: English-Australia, then you need translate resources in value-en-rAU folder; otherwise just translate values-en.
xml folder: contains other xml files.
Smali Folder: contains smali codes (like a low level java source code), sometimes they contains const-strings that you may want to translate as well. But I want you too touch it, unless you know what you’re doing. you can use notepad++ to work with it.
Play around with these folder until you understand what they are for.
————-
Ok, let’s play with xml file

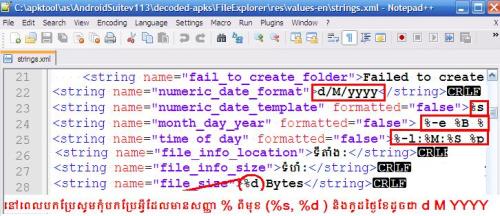
Use notepad++ (or other xml editors) to open the xml file. And translate things in between <string name=”xxxx”>here</string>. But be careful when work with date time string and string contains % in front of it. Don’t translate strings that have % in front of them.
Example
<string name=”app_name”>FileExplorer</string>
to
<string name=”app_name”>គ្រប់គ្រងឯកសារ</string>
When doing the translation, make sure you use simple term that easy for user to understand. You don’t know how to translate some words, check English – Khmer computer glossary
app_name, app_lable, or label, normally, refer to the name of the application that appear on your launcher home screen.
Let’s play with images in drawable-hdpi
well, you can use photoshop or just a simple paint software to modify the image resources. I won’t talk much about this.
resources.arsc
after you recompile it, the value folders and other folders will pack into resources.arsc.
2.a.3 Working on Android Suite

Fig 2.a.3.1 Android Suite interface (Click on it to Enlarge)

Fig 2.a.3.2 Android Suite Folder structure (click to enlarge)
Before we start, we need to understand AndroidSuite folder structure:
You will find the follow folders in C:\andriodsuite (or where you just extracted the file to)
—–
apk folder: where you put the apk files that you want to translate into Khmer
decoded-apks folder: where you can find resource of decompiled apk folder (such as xml, jpg, png, smali)
encoded-apks folder: where you can find the modified apks (that you just translated).
unsigned folder: you any apk file and rename it into apk.apk, then click on [App Signer] button on the Android Suite to sign the apk.
—–
Ok, now we are ready. (look at the pictures above Fig 2.a.3.1)
Step 1: Copy the apk that you want to translate to the apk folder.
in this example FileExplorer.apk.
- click on [Open APK dir], and copy your apk into it.
- click on [Refresh lists] to update the screen.
Step 2: decoded the apk file.
- click on [<< Refresh list] to update the screen. and select your apk from “select what to decode”
- click on [Decode Selected] (and wait until the progress bar stop)
- click on [Open decoded Dir] to find the FileExplorer folder. (check out section 2.a.2 on how to translate resources)
Step 3 & 4: encode the apk file.
-on your Android Suite software, click [<<Refresh lists], select your apk resource folder name from the list under “what to encode “
- click on [Encode Selected] (and wait until the progress bar stop)
- click on [Open Encoded Dir] to find the your modified FileExplorer.apk.
Step 5: sign the apk file.
- copy the apk file to unsigned folder, then rename it into apk.apk
- click on “apk signer” to generate signed file. Once it’s done, you will see signed-apk.apk. Now you can rename it to anything you like, but I prefer you to rename it into signed-apkname.apk (example: signed-fileexplorer.apk).
ប្រភព Nokorsoft.com
Comments
Post a Comment